Showing posts with label Fall Decorating. Show all posts

Sunday, November 24, 2013

2 Easy Buntings for Your Fall Decorating

We don't have a lot of decorations for Thanksgiving, but we do have a few. I also made a few new ones, I made two different buntings from items I already had around the house.  They are both very easy to put together. Easy is good, right?
This is what our mantel looks like right now. Very minimal huh? I like it!  I even kept the little 2x4 pumpkin out that I showed you how to make HERE.
First is the Folded Bookpage Bunting.  So easy a kid can do it!  Remember when you were a little girl and you folded notebook paper into a fan? Same technique here, just use old book pages. 
I folded each book page in half  long ways and then folded them in half again at a slight angle, punched a hole in the bend and then strung them on a long piece of jute twine.  There are 12 single pages in the center of the bunting and then the two "fans" on the end are four pages together.  I made a loop in the jute on each end for hanging.
Now for the Natural Pinecone Bunting.  Even easier, well if you have a sweet honey to help you like I do!  Thank you Baby!
You'll need something to hang your pinecones on the twine.  We used some heavy wire and my honey bent them by hand (with pliers) into little hooks for me.  I tried, but I'm too weak! LOL!
Next, drop a dollop of hot glue on the bottom of the pinecone and add your hook.
Now its ready for hanging on a long length of jute twine.
I hung the big pinecones on the outside and little ones on the inside, but that's how I roll! :)
If you follow me on Instagram you may have already seen this picture.  My little photo bomber Sarah!
And speaking of photo bombers...meet Zel!  He's the sweetest boy EVER!  I really love the simple decor our little fire place is sporting right now. You know.....its almost time to break out the Christmas goodies!

It doesn't have to be done all at once.  It is a slow process in the works! C-ya next time!

I'm Linking to:
Sunday
Under the Table and Dreaming by Stephanie Lynn

The Self Sufficient Home Acre 
The Chicken Chick,  Sew Can Do
Monday
Craft-O-Maniac, 

Between Naps on the Porch
DIY Home Sweet Home
Keeping it  Simple 
The Dedicated House
Skip to my Lou
Home Coming
Tuesday
Not Just a Housewife

My Uncommon Slice of Suburbia
Sugar Bee Crafts 
New Nostalgia 
It's your Life

BeBetsy
Fluster Buster   
Confessions of a Plate Addict
A Stroll Thru Life
Wednesday
Clean and Scentsible

Lady Behind the Curtain
Family Home and Life
Ducks n a Row
VMG206
Herrban Momma 
Family Home & Life
Oh My! Creative
Thursday  
Bloom
The Taylor House
52 Mantels
Domesblissity
4 You With Love
Sweet Haute
Artsy Fartsy Mama
From My Front Porch To Yours
Friday 
Lil’ Luna
Tatertots and Jello
Five Simple Things
Craftionary
Diana Rambles
I Heart Nap Time
Crafts a la mode
Saturday 
Angels Homestead
Positively Splendid,
Or So She Says
Your Homebased Mom
What's Cooking with Ruthie
Made From Pinterest

read more

Sunday, October 20, 2013

DIY Spooky Bottle Labels

We interrupt this blog post for a special announcement!  If you look over in the right hand column (scroll down a bit), you will see our blog followers.  This past week we hit 100 followers and now we even have one more! Woohoo! Thank you to all that follow us and keep coming back to visit and a special BIG thank you to all who take the time to leave a nice comment!  We really enjoy your comments!
Now back to our regularly scheduled post!  Did someone say spooky bottle labels? Oh yeah! I did! LOL!  I actually made these a few years back and shared them on my card blog, but I wanted to share them here too because I really enjoy decorating with them each year and the labels are still available for FREE!
Here they are this year just hanging out on the old Hoosier.  Love!  Every year I add something new to our decorations, but each year the old bottles come out to sit a while and look spooky!  In case you're interested, the old book pumpkin how to can be found HERE and the crow's nest on an old bed spring can be found HERE.
I found the spooky labels HERE , printed them out on a cream colored card stock, cut them out and then used Aleen's Tacky Glue to stick them on the bottles.  Just an FYI, not all glue will adhere to glass, so you may have to do some experimenting with the glues you have in your stash.
Eeww!  Slug Juice!  For advanced wizards only!  Haha!  There are a whole page of the labels and they all look really cool and spooky!  So much detail in each label.
I put this original wart tonic label on an old snuff jar.  We collected our jars and bottles from yard sales and resale shops and didn't spend over $2 for any of them.  Just look and you'll find old interesting bottles to use!
This is a craft that is easy and can be used year after year if you want to like we do! Do you decorate for Halloween? Did you make something fun this year? Leave a comment and let us know!

It doesn't have to be done all at once.  It is a slow process in the works! C-ya next time!

I'm Linking to:
Sunday
Under the Table and Dreaming by Stephanie Lynn

The Self Sufficient Home Acre 
The Chicken Chick,  Sew Can Do
Monday
Craft-O-Maniac, 

Between Naps on the Porch
DIY Home Sweet Home
Keeping it  Simple 
The Dedicated House
Skip to my Lou
Home Coming
Tuesday
Not Just a Housewife

My Uncommon Slice of Suburbia
Sugar Bee Crafts 
New Nostalgia 
It's your Life
Get Your Crap Together
BeBetsy
Fluster Buster   
Confessions of a Plate Addict
A Stroll Thru Life
Wednesday
Clean and Scentsible

Lady Behind the Curtain
Family Home and Life
Ducks n a Row
VMG206
Herrban Momma 
Family Home & Life
Oh My! Creative
Thursday  
Bloom
The Taylor House
52 Mantels
Domesblissity

4 You With Love
Sweet Haute
Artsy Fartsy Mama
From My Front Porch To Yours
Friday 
Lil’ Luna
Tatertots and Jello
Five Simple Things
Craftionary
Diana Rambles
I Heart Nap Time
Crafts a la mode
Saturday 
Angels Homestead
Positively Splendid,
Or So She Says
Your Homebased Mom
What's Cooking with Ruthie
Made From Pinterest

read more

Sunday, October 13, 2013

2 x 4 Black Cats & Pumpkin

Oh boy did I have fun making these little cuties!  These are simple and so much FUN!  You've gotta try some for yourself!
Yes, you are SO right! I did see this idea on Pinterest! How did you guess?  Actually I saw the black cats on Pinterest and the pumpkin on YouTube.
Like I said, I saw the cats on Pinterest but there was no link to where they come from or how to make them. Don't you hate when that happens?  Me too!  So, I'm going to explain how I made mine for you!
First mark you cuts with a pencil and cut to length. (I used our chop saw to cut to length)  Mine are 12", 10" and 8" tall.  The ears are 2" tall.  I measured 2" down from top middle and made a mark, then I used a ruler and made a line from each corner to the 2" mark.
Next I used the jig saw to cut out the ears.  I clamped the 2x4 to the table and then got to cutting.  Be sure to wear your safety glasses please!
Next I smoothed out all the rough edges using the mouse sander and some medium grit paper.
Now for painting.  I used black acrylic paint and a sponge brush to paint them.  I painted all sides except the bottom and let them dry.
And because I can't just leave anything alone, I used the mouse sander again to distress the front edges only.  Lastly tie a raffia bow around the neck and add googly eyes.
The pumpkin had a really good video by Hey Kalie on Youtube (link to video back up above).  I however put a little different look on mine. Rustic and distressed of course!
I cut my 2 x 4s at 5" and 4" (2 of each size).  I used the mouse sander to smooth all the rough edges.
Next, I used my hot glue gun and glued the pieces of wood together.  The two 5" pieces go together in the middle and one 4" piece goes on either side.
Next, using some orange acrylic paint and my sponge brush I gave them a good coat of paint.  All sides except the bottom.
In Kaylie's video she used a big cork for her stem.  I decided to use wood because its what I had available to me at the time.  It is measured at 2 1/2" tall by 1" square.  I glued it on the top middle.  I distressed the whole thing with the sander and added a raffia bow.
I love a craft that is simple and easy!  This was one of those kind of crafts!  I think I want to make more now?!?!!

It doesn't have to be done all at once.  It is a slow process in the works! C-ya next time!

I'm Linking to:

Sunday
Under the Table and Dreaming by Stephanie Lynn
, The Self Sufficient Home Acre , The Chicken Chick,  Sew Can Do 

Monday
Craft-O-Maniac, Between Naps on the Porch, DIY Home Sweet Home
, Keeping it  Simple , The Dedicated House, Skip to my LouHome Coming, 

Tuesday
Not Just a Housewife, My Uncommon Slice of Suburbia,  Sugar Bee CraftsNew NostalgiaIt's your Life,   
Get Your Crap Together  ,  BeBetsy,  Fluster Buster  Confessions of a Plate Addict

Wednesday
Clean and Scentsible, Lady Behind the CurtainFamily Home and Life,  Ducks n a Row, 
VMG206.  Herrban MommaFamily Home & Life  ,Oh My! Creative

Thursday
Bloom,    The Taylor House.  52 Mantels,  Domesblissity,  Redfly Creations,   4 You With Love,  Sweet Haute
Artsy Fartsy Mama
 From My Front Porch To Yours

Friday 
Lil’ Luna,,  Tatertots and JelloFive Simple Things,  Craftionary,  Diana Rambles,    I Heart Nap Time,    Crafts a la mode

Saturday 
Angels HomesteadPositively Splendid,   Or So She Says Your Homebased Mom What's Cooking with Ruthie
Made From Pinterest

read more

Sunday, October 6, 2013

Chalkboard Art for Fall

Fall finally arrived this weekend in Texas. At one point yesterday, we were in the 40s with a bit of wind and rain! We even made our first fire of the season to celebrate the cool weather.
Notice anything different about my chalkboard? Well yes, I did change the art, but I also changed the frame color. How do you like it?  Even though I loved the red colored frame, it sort of stuck out like a sore thumb in our newly redecorated kitchen.  I think I like this shade of green better than the red!
I loved the look of THIS pumpkin so I tried my best to recreate it, but in color.  I used my crayola brand chalks again as I have with all my other chalk art designs.
It took me a while to get the pumpkin to look like I wanted it to, but as usual I really love how it turned out!  Just in case the crayola people are reading this now, could you make some Fall colored chalks? Alrighty! Thanks!
The purple and blue "Fall" is a bit out of the Fallish color scheme, but ya know, sometimes you just gotta use what you have available at the time! LOL!
On the pumpkin itself, after I went over the outside lines several hundred times, I laid the chalk on its side and used it to shade or color in the body of the pumpkin. Looks pretty cool!
Now I've got to do something to doll up those two white candles on top of the hutch.  Oh Pinterst...here I come!

It doesn't have to be done all at once.  It is a slow process in the works! C-ya next time!

I'm Linking to:

Sunday
Under the Table and Dreaming by Stephanie Lynn
, The Self Sufficient Home Acre , The Chicken Chick,  Sew Can Do 

Monday
Craft-O-Maniac, Between Naps on the Porch, DIY Home Sweet Home
, Keeping it  Simple , The Dedicated House, Skip to my Lou
Married Filing JointlyHome Coming,  The Princess and Her Cowboys

Tuesday
Not Just a Housewife, My Uncommon Slice of Suburbia,  Sugar Bee CraftsNew NostalgiaIt's your Life,   
Get Your Crap Together  ,  BeBetsy,  Fluster Buster  Confessions of a Plate Addict

Wednesday
Clean and Scentsible, Lady Behind the CurtainFamily Home and Life,  Ducks n a Row, 
VMG206.  Herrban MommaFamily Home & Life  ,Oh My! Creative

Thursday
Bloom,    The Taylor House.  52 Mantels,  Domesblissity,  Redfly Creations,   4 You With Love,  Sweet Haute
Artsy Fartsy Mama
 From My Front Porch To Yours

Friday 
Lil’ Luna,,  Tatertots and JelloFive Simple Things,  Craftionary,  Diana Rambles,    I Heart Nap Time

Saturday 
Angels HomesteadPositively Splendid,   Or So She Says Your Homebased Mom What's Cooking with Ruthie
Made From Pinterest

read more

Sunday, September 29, 2013

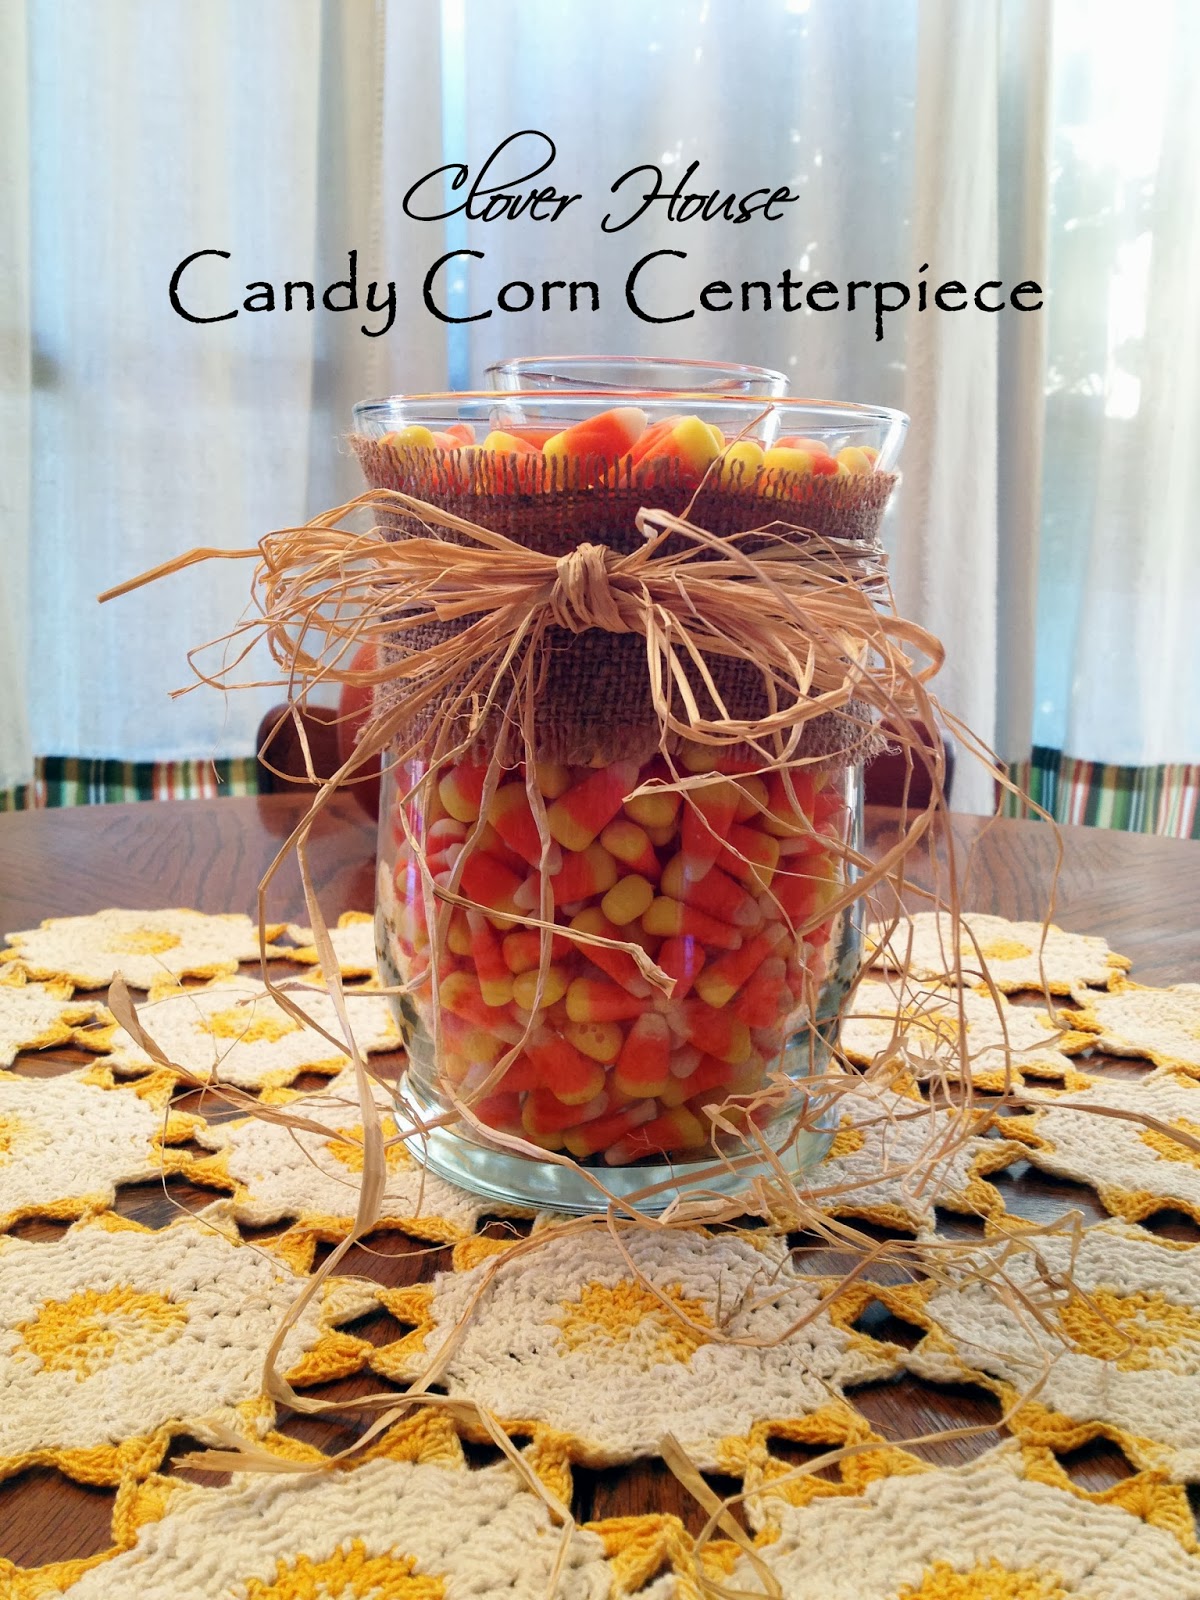
Candy Corn Centerpiece - Easy and Inexpensive!

Do you like candy corn? I do!  I thought it would be fun to make an eatable centerpiece for our kitchen table.
I've seen all types of these same ideas on Pinterest so I decided to make one this year.  So easy and really inexpensive for something so cute.
You will need:

Candy Corn - I used 2 bags - $1 each
A vase - $3.95 at Walmart
A tall jar that fits in your vase - I save everything!
A strip of burlap (3" wide) - left over from another project
A small bundle of raffia - from my craft stash
A candle - $3 from the dollar store
Step 1:  Place your jar inside the vase with lid on, keep it in the center of the vase the best you can.
Step 2:  Add candy corn all the way up to the bottom of the lid of the jar.  Make sure the candy is settling into the open spaces.  Tap or jiggle the vase to get it to settle in.
Step 3:  Place your candle on top of the lid of the jar and continue adding candy corn.  I held onto the candle so it wouldn't move while I added the remaining candies.
I stopped adding the candies at just about where the candle wax started.  There were still some candy corns left over so we had to go ahead and eat those. Heehee!
Step 4:  Add the burlap strip.  I cut a strip about 3 inches wide and a little longer than enough to fit around the vase top.  I removed a few strings on both sides to give it that frayed look.  I held it in place with a pearl head pin.
Step 5:  Wrap the raffia around the burlap strip, tie a bow, fluff the bow to your liking and your done!
A simple and yummy Halloween craft to beautify your table!  You could use this same centerpiece throughout the holidays by simply changing the candies and color of your candle.

It doesn't have to be done all at once.  It is a slow process in the works! C-ya next time!

I'm Linking to:

Sunday
Under the Table and Dreaming by Stephanie Lynn
, The Self Sufficient Home Acre , The Chicken Chick,  Sew Can Do 

Monday
Craft-O-Maniac, Between Naps on the Porch, DIY Home Sweet Home
, Keeping it  Simple , The Dedicated House, Skip to my Lou
Married Filing JointlyHome Coming,  The Princess and Her Cowboys

Tuesday
Not Just a Housewife, My Uncommon Slice of Suburbia,  Sugar Bee CraftsNew NostalgiaIt's your Life,   
Get Your Crap Together  ,  BeBetsy,  Fluster Buster  Confessions of a Plate Addict

Wednesday
Clean and Scentsible, Lady Behind the CurtainFamily Home and Life,  Ducks n a Row, 
VMG206.  Herrban MommaFamily Home & Life  ,Oh My! Creative

Thursday
Bloom,  Two Yellow Birds Decor,  The Taylor House.  52 Mantels,  Domesblissity,  Redfly Creations,   4 You With Love,  Sweet Haute
Artsy Fartsy Mama
 From My Front Porch To Yours

Friday 
Lil’ Luna,,  Tatertots and JelloFive Simple Things,  Craftionary,  Diana Rambles,    I Heart Nap Time

Saturday 
Angels HomesteadPositively Splendid,   Or So She Says Your Homebased Mom What's Cooking with Ruthie
Made From Pinterest

read more

Sunday, September 15, 2013

Buttons and Burlap Pumpkins - An Easy Pictorial

It's not too early to be thinking about Fall decorating is it? I mean heck, here in Texas we've been in the low nineties this weekend. Ha!
I know this is not a new idea, but I like it!  I pinned the idea a really long time ago and just never got around to creating these cute button pumpkins until now.

To recreate my pumpkins, you will need:
Foam pumpkins
Black buttons
Spanish moss
Burlap ribbon
Pearl head pins
Alene's quick dry tacky glue
Hot glue gun
Scissors
First, you start off with a foam pumpkin.  Mine are medium sized (approximately 8" wide) and I got them at Walmart for $4.95 each.
You'll also need a bunch of black buttons.  I really love the vintage buttons at Papertrey Ink.  You gets lots of buttons in all sizes for $5.00.  The bag full was more than plenty for my two pumpkins.
I used Aleen's Quick Dry Tacky Glue to adhere the buttons.  It dries fast, but not so fast you cant get them just how you want them before they're stuck.  The glue goes on white, but dries clear.
Next I added some Spanish moss.  Using my hot glue gun on the low setting, I added a liberal amount of glue just to the top area around the stem.
I do this in small sections so the glue doesn't cool and I don't get a good adhesion.  Even on the low setting, the glue is still hot so be careful getting your fingers in the hot glue!
This is how it should look when you get all the moss glued around the top.  It doesn't have to be perfect either, just covering the top is good.
Next I added the burlap ribbon.  Since the pumpkin is foam, I was able to use the little pearl head pins to attache the ribbons.  It's easier than using the hot glue.  You can get them just right and you won't burn your fingers.
Just add the pins where you want to tuck in the ribbon to form the type of bow your going for.  If you dont like it, pull the pis out and start all over!
The burlap ribbon I used on the BOO pumpkin is one I had in my stash from last year.  I used it on my bed spring crow's nest HERE.
I only had enough ribbon to do one pumpkin, so off I went to Walmart to get more.  They no longer carry that type, but they had another one that is wider and much softer.  I actually prefer working with the new one better.
I love how they turned out and they were really pretty easy to make.  The hardest part was getting the buttons just right.  What kind of pumpkins are you making this year? Please share with me!

It doesn't have to be done all at once.  It is a slow process in the works! C-ya next time!

I'm Linking to:

Sunday
Under the Table and Dreaming by Stephanie Lynn
, The Self Sufficient Home Acre , The Chicken Chick,  Sew Can Do 

Monday
Craft-O-Maniac, Between Naps on the Porch, DIY Home Sweet Home
, Keeping it  Simple , The Dedicated House, Skip to my Lou
Married Filing JointlyHome Coming,  The Princess and Her Cowboys

Tuesday
Not Just a Housewife, My Uncommon Slice of Suburbia,  Sugar Bee CraftsNew NostalgiaIt's your Life,   
Get Your Crap Together  ,  BeBetsy,  Fluster Buster

Wednesday
Clean and Scentsible, Lady Behind the CurtainFamily Home and Life,  Ducks n a Row, 
VMG206.  Herrban MommaFamily Home & Life  ,Oh My! Creative

Thursday
Bloom,  Two Yellow Birds Decor,  The Taylor House.  52 Mantels,  Domesblissity,  Redfly Creations,   4 You With Love,  Sweet Haute

Friday 
Lil’ Luna,,  Tatertots and JelloFive Simple Things,  Craftionary,  Diana Rambles,    I Heart Nap Time

Saturday 
Angels HomesteadPositively Splendid,   Or So She Says Your Homebased Mom What's Cooking with Ruthie

read more